Data Classification
ALTR offers a variety of data discovery tools to assist in data discovery and governance, including an integration with Google Data Loss Prevention (DLP) tools as well as Snowflake's data classification capabilities. These integrations enable ALTR customers to scan data sources connected to ALTR and to identify what data may be sensitive. This information can then be used to automate access controls and security policies.
Snowflake Note:
If you are concerned about resource usage and speed, Google DLP may be the best option; but if your data cannot leave your Snowflake instance, then Snowflake Native is the best choice.
Google Data Loss Prevention (DLP) Classification
ALTR’s integration with Google’s DLP classification tool works with both Snowflake and Databricks. It randomly samples data from individual columns only, never from full rows. This ensures the data is scrambled, cannot be reconstructed, and is meaningless on its own. The sampled data is then classified using Google’s DLP API. This API may return an "infotype" indicating what kinds of data may be present in the sample. ALTR provides this information back to users in a Classification report.
The classification report not only shows you what data might be sensitive, but you can also use the results to automatically assign object tags to columns. Learn more about automatic tagging.
ALTR does not sample customer data or send it to the Google DLP service without it being explicitly enabled by the customer. By default, classification is disabled. To enable classification, select Tag Data by Classification for the data source. Learn more..
ALTR randomly selects samples of data from each column to prevent row identification and does not persist or log the sample of data sent to Google’s DLP service.
To obtain the database sample for classification, ALTR:
Counts the number of columns in the table and multiplies it by 2.
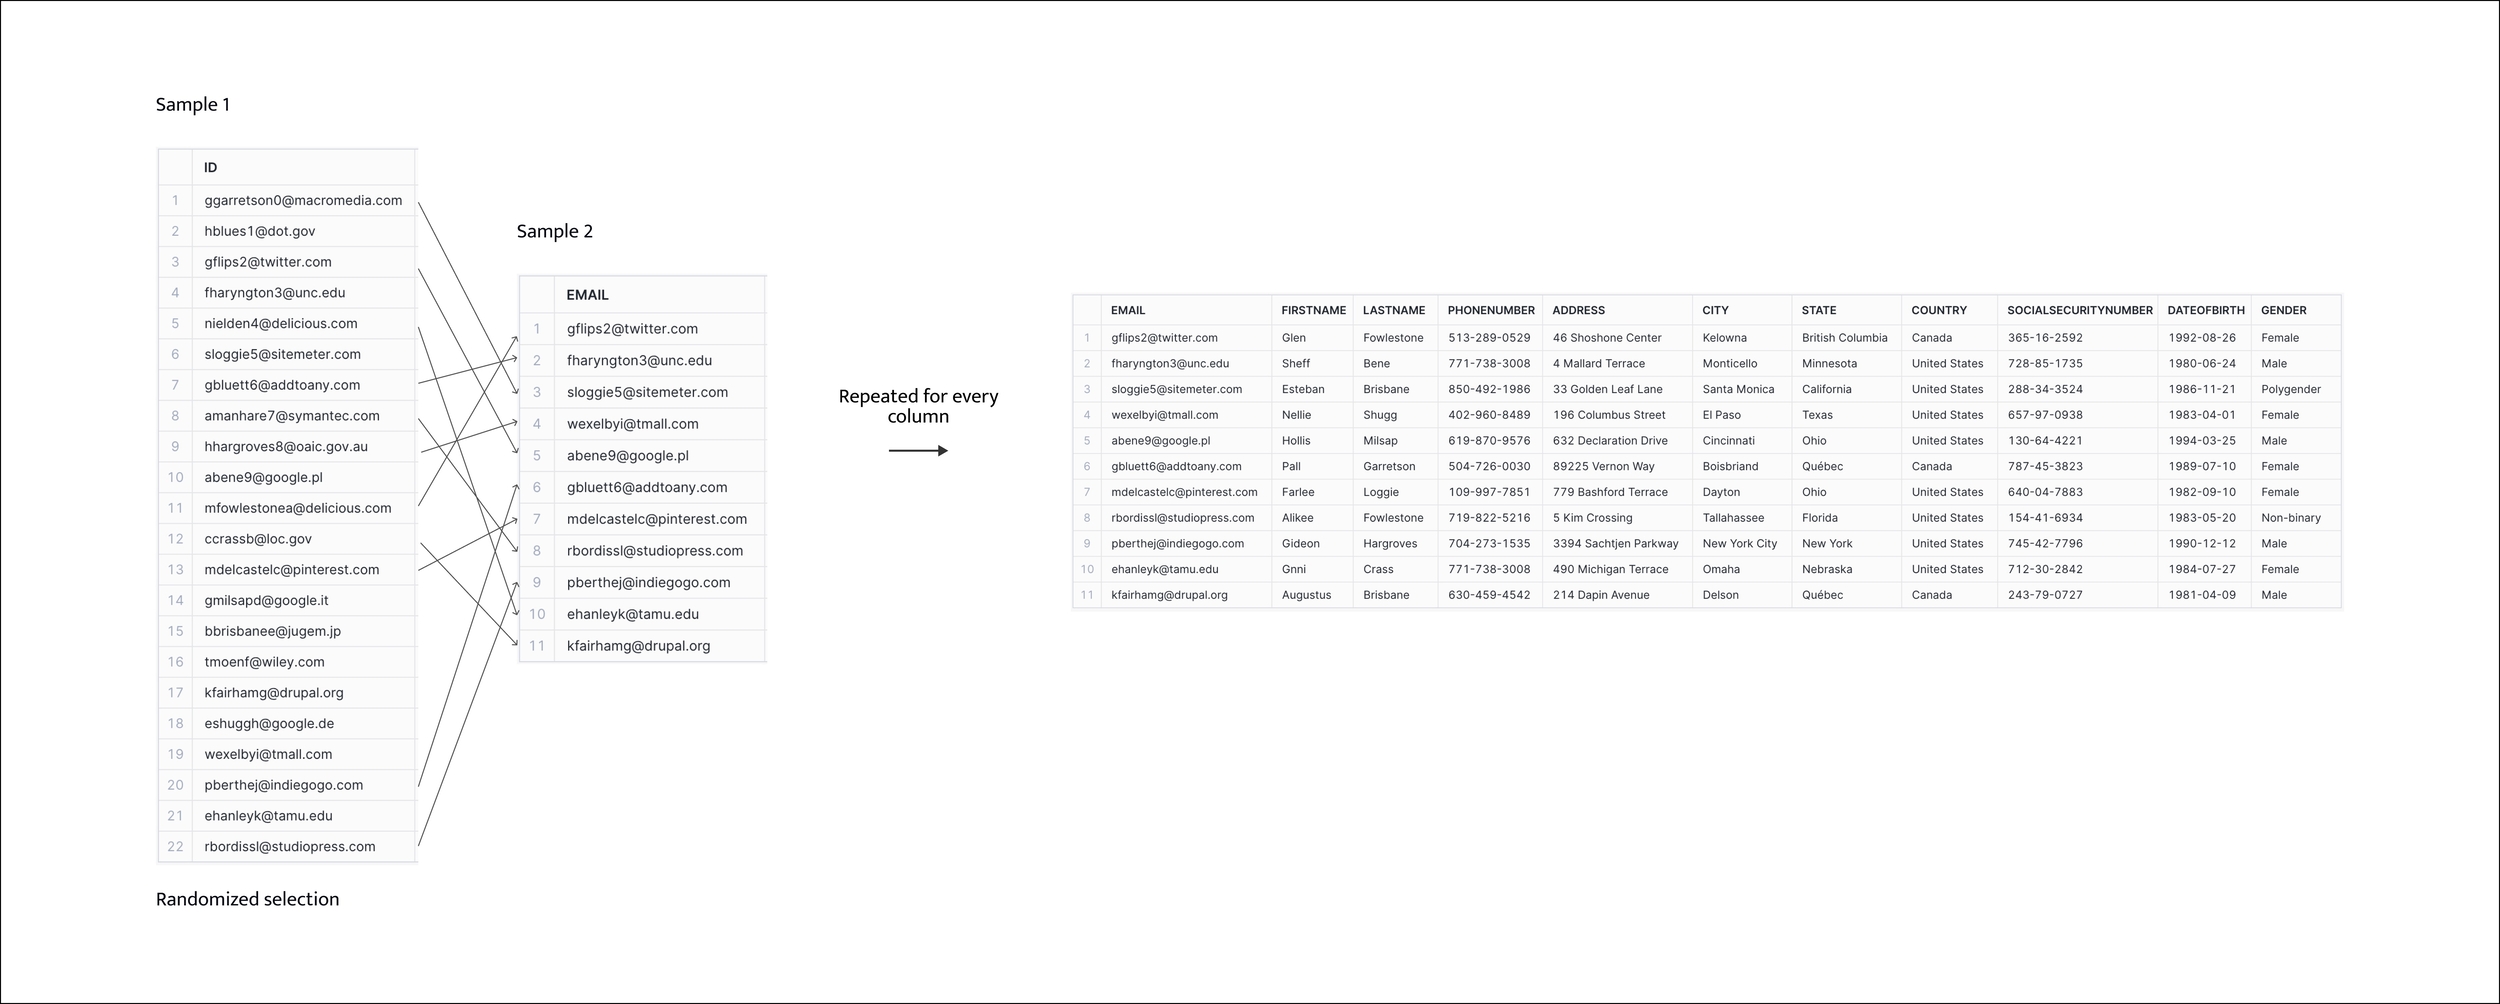
Randomly selects [(column count) x 2] rows from the table. For example, if there are 10 columns, ALTR selects 20 rows. This data set becomes Sample 1.

Uses Sample 1 to create a Sample 2 that is half the number of rows as Sample 1.
Starting with the first column, ALTR randomly selects 10 values from Sample 1, and places them in rows 1 through 10 of the corresponding column in Sample 2. This process is repeated for each column. This is the sample that is sent to Google DLP.

Sample 2 scrambles the table without changing the type of data in each column. Any particular column value may or may not be related to the other values in the same row.
Classification may take several minutes to run depending on the number of columns in the data source. An email is sent to administrators once the classification is complete.
Performing a Google DLP classification on Snowflake data sources activates a Snowflake warehouse. The length of time this warehouse is active depends on the number of columns present in the data source.
To run a Google DLP classification:
Select → in the Navigation menu.
Create a data source or edit an existing data source.
Select the Tag Data by Classification check box.
Select Google DLP Classification from the Tag Type list box.
Click Save.
Performing a Google DLP classification on a Databricks metastore activates a Databricks compute. The length of time this compute is active depends on the number of columns present in the metastore.
To run a Google DLP classification:
Select → in the Navigation menu.
Create a data source or edit an existing data source.
Select the Run Data Classification Scan check box.
Click Save.
Once administrators received an email that the classification has completed, view the classification report in ALTR.
To view the classification report:
Select → in the Navigation menu.
Click the Classification Report tab; a list of all classification reports display.
Click a report to view details.
Snowflake Classification
ALTR's integration with Snowflake classification enables customers with connected Snowflake data sources to classify columnar data without sampling or sending data to third parties. This option is useful when customers do not want ALTR to sample data or send it over Google's DLP API. When a Snowflake classification is completed, the resulting Semantic Categories are assigned to relevant columns within Snowflake as object tags.
The classification report not only shows you what data might be sensitive, but you can also use the results to automatically assign Snowflake object tags to columns. Learn more about automatic tagging.
Classification may take several minutes to run depending on the number of columns in the data source. An email is sent to administrators once the classification is complete.
Performing a Snowflake classification on Snowflake data sources activates a warehouse. The length of time this warehouse is active depends on the number of columns present in the data source.
To run a Snowflake classification:
Select → in the Navigation menu.
Create a data source or edit an existing data source.
Select the Tag Data by Classification check box.
Select Snowflake Classification and Object Tag Import from the Tag Type list box.
Click Save Changes.
Once administrators received an email that the classification has completed, view the classification report in ALTR.
To view the classification report:
Select → in the Navigation menu.
Click the Classification Report tab; a list of all classification reports display.
Click a report to view details.